Window adjustment instructions

A plastic window is a reliable product with a service life of decades. However, even the most durable mechanism requires maintenance and adjustment. Window adjustment is necessary for any disruptions in their normal operation. For example:

Layout diagram of window hardware components

  1. Top reinforced hinge;

  2. Bottom reinforced hinge;

  3. Anti-burglary trunnion lock;

  4. Locking mechanism;

  5. Incorrect opening blocker;

  6. Locking strips;

  7. Striker plates;

  8. Locking pins.

List of necessary tools

Adjusting the pressure of a plastic window

If the window doesn’t close tightly, use a hex key to adjust the turn of the striker. Turning it to the left increases the pressure, while turning it to the right reduces it. Maximum pressure is achieved when the eccentric is positioned with the key socket facing the outer part of the sash. Minimum pressure is achieved when the eccentric is positioned oppositely, with the key socket facing the inner part of the sash.

To ensure uniform pressure along the perimeter, all strikers’ eccentrics should be set in the same position Non-uniform pressure accelerates seal wear and compromises the window’s seal integrity when closed.

Adjusting the rotation of the trunnion with a key

Adjustment of different trunnions:

  1. - Standard (average degree of sash compression);

  2. - For the summer period (adjustment for minimum sash compression);

  3. - For the winter period (maximum sash compression).

In some cases, adjusting the window espagnolette may not achieve maximum compression, and drafts may still be felt when the window is closed. This occurs when the sash is misaligned vertically or horizontally. As a result, some parts of the espagnolette may not fully engage with the corresponding parts.

Adjusting the compression near the upper hinge

Adjusting the compression on the hinge side is done using screws located on these hinges. To access the screw located on the scissors near the upper hinge, follow these steps:

Adjusting Window Sashes

If your window sashes are misaligned, you can adjust them using a wedge-shaped bearing. The adjustable parts of the window sash are depicted in the diagram and marked A, B, C.

Diagonal adjustment:

If the sashes are positioned too low or too high in the frame, adjust the height setting:
If the window is stuck on one side, you need to perform lateral adjustment:

Adjusting the hardware of plastic windows

The plastic handle can break. Sometimes there is a need to replace regular handles with locking handles: windows equipped with them can only be opened with a key, which can be useful in a child’s room To change the handle, you will need a Phillips screwdriver.

To address issues with the window handle, if the handle does not turn completely when closing the window, it indicates that one or more locking bolts are hitting the protrusions of the locking bars. This problem is corrected by adjustment. When opening the tilt-turn sash, the mechanism may malfunction, causing the handle to jam in the intermediate position.

Replacing the window handle or installing a handle with a lock

The screws that attach the handle to the sash are located under the oval decorative cover. To access them, lift the cover at its ends and rotate it 90 degrees. Unscrew the screws using a screwdriver and remove the handle Install the new handle in the reverse order.

If the handle turns with difficulty or does not lock into standard positions, the cause is often the clogging of the mechanisms. In this case, unscrew the handle and clean all moving parts of the structure with an aerosol. After that, lubricate the window with machine oil.

Replacement of the seal

The seal —  is a gasket made of various materials (rubber, silicone, or thermoplastic) in a tubular structure Its main task is to seal the joints, thereby increasing the protective properties of the profile.

Since drafts in windows can occur due to wear and tear of the sealing rubber, don’t forget to check its condition. Timely replacement of the gasket will help prevent this.

A dried out or damaged seal is easy to replace. Simply remove the old rubber from the groove and then carefully place the new one without stretching it (this is important). To ensure it maintains the necessary level of insulation for longer, wipe it down and lubricate it with silicone grease several times a year. Try not to use aggressive cleaning agents that could harm the components.

Cleaning the parts

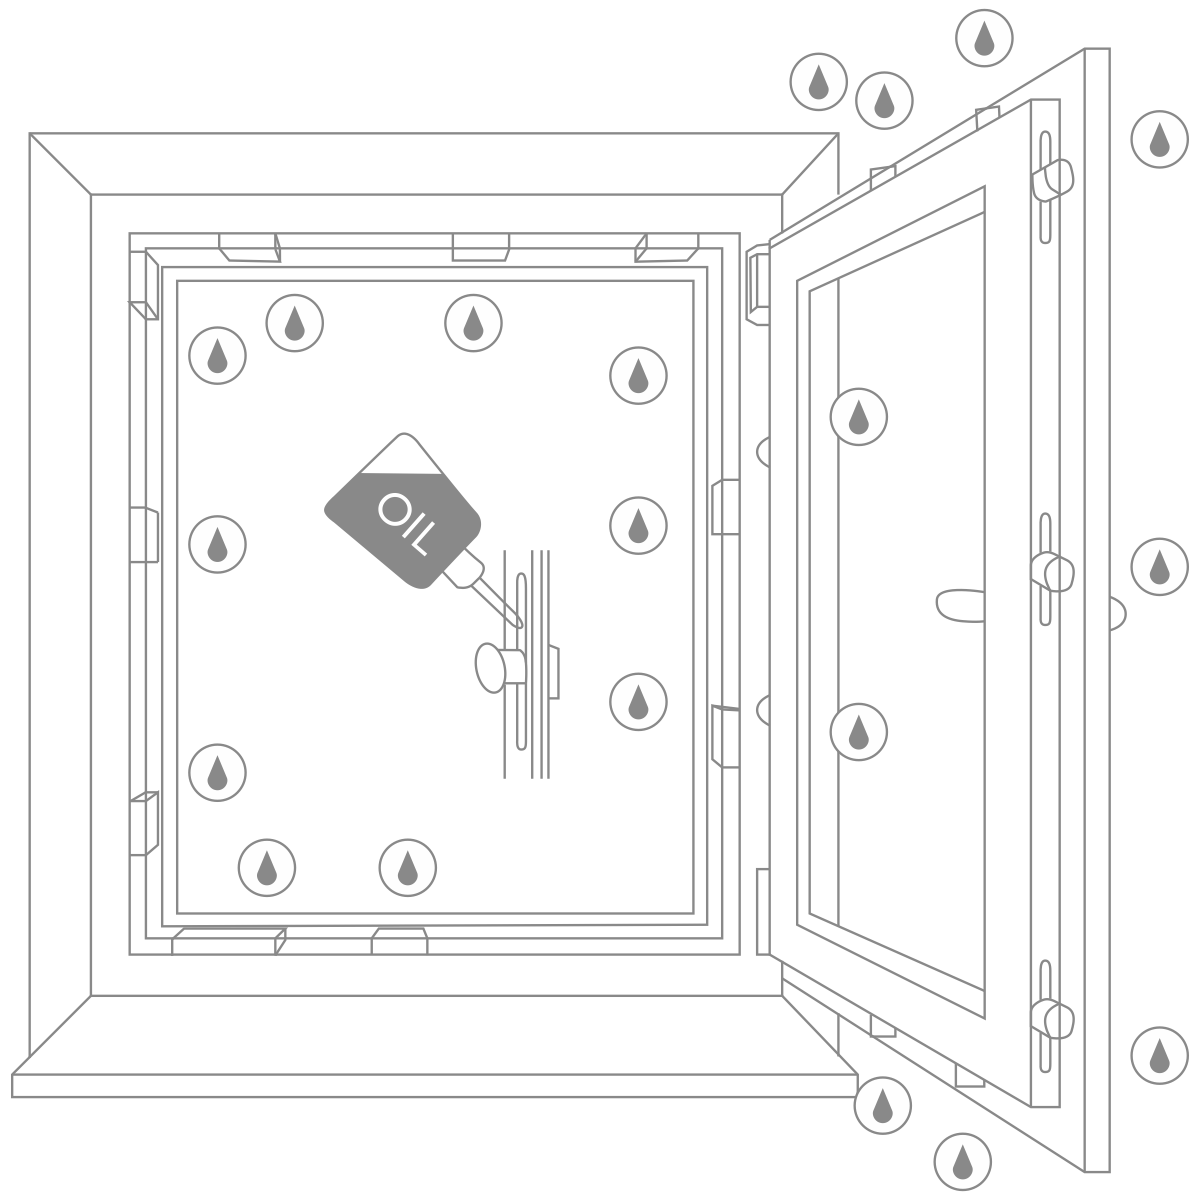
Regular cleaning extends the service life of window mechanisms — it reduces friction and wear of moving parts, protecting them from corrosion.

To lubricate, any household lubricating oil can be used, including water-displacing fluid.

Before lubricating, mechanisms should be cleaned of dust and dirt (avoid using stiff sponges, cleaning agents for plumbing, and stainless steel utensils).

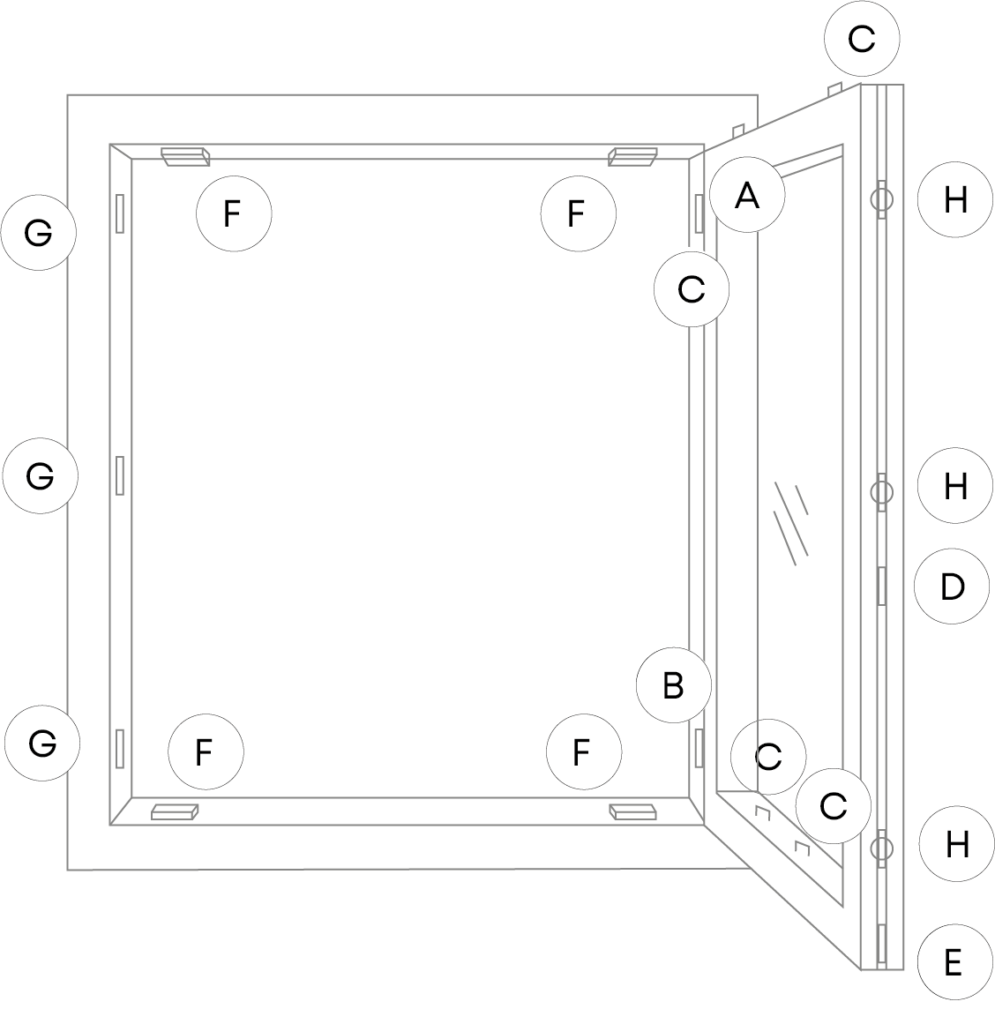
During seasonal maintenance, it’s also important not to forget to clean the drainage holes in the upper and lower profiles of the frames. They are clearly visible when the sashes are open, but covered with decorative caps from the outside when closed.

The areas for cleaning and lubricating the mechanisms are marked with an oilcan icon - one to two drops of oil are applied into the holes

Reference materials

Do you have any further questions?

Our specialist will contact you shortly and answer all questions regarding Framex.

Compare listings

Compare